Custom Deli Slices
- Jax Whitham
- Mar 21, 2025
- 2 min read
Updated: Apr 4, 2025
Task 1: Create a Basic Slicer
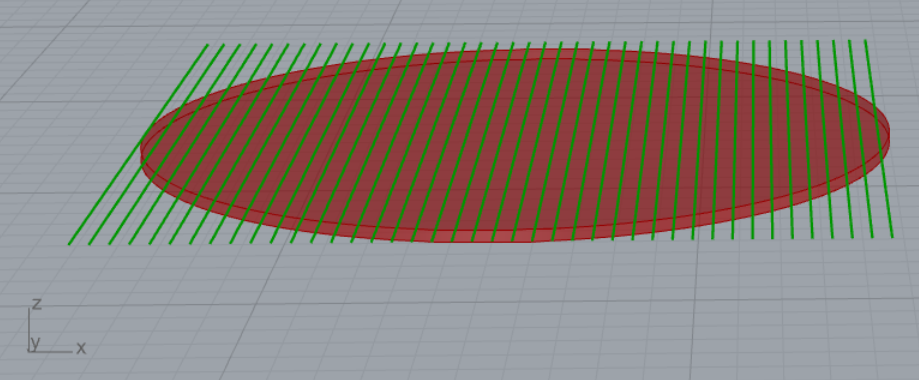
this task builds upon the early sections of the 3d to 2d slicer project outlined in Stacking Up with a Parametric Grasshopper. A given shape in rhino, set to a geometry in Grasshopper and sliced with the assumed layer thickness of 0.3 mm.


Height in the photo above is set to 1.2 mm with 0.3mm layer height to demonstrate multiple slices. Additionally, the first layer height is Z=0.3 since a print can't be successfully completed at Z=0.
Infill lines are rectilinear and parallel to the y-axis and initially intersect with the boundary curve. The spacing between lines at 100% infill accounts for filament extrusion width. Segments of lines that extend beyond the boundary curve are trimmed. Infill density is controlled with the slider encompassed in purple.


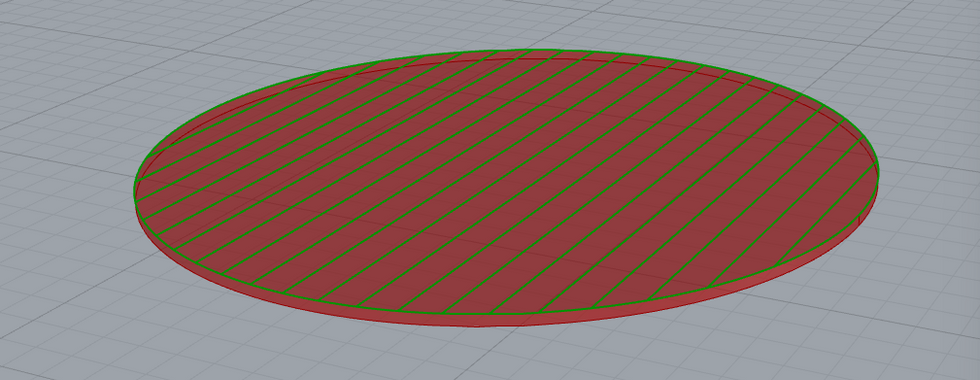


Cylinder height has been adjusted to 0.3mm for clarity of infill demonstration. Infill lines in images 4, 5, 6 and 7 (above) are seen at 100%, 50%, 20% and 10% infill, respectively.
Once infill density selected and excess lines have been trimmed, contour and infill lines are merged, segmented and simplified. These steps occur in preparation of g-code generation.
Task 2: G-Code Generation in Python/GH
A custom Python component in Grasshopper converts lines generated in grasshopper into to movements executable but a 3D printer, G-code specifically a Prusa MK3S+. The E-value is solved for before it is added to string with X and/or Y coordinates.Once ever line is processed into g-code, start and end g-code are concatenated with the generated g-code, forming a complete g-code script.


Task 3: Exporting and Validating Generated G-Code
After confirming functionality of the sensor at multiple heights (0.3mm singer layer and 1.5mm 5-layers).

Task 4: Fabrication and Comparison
Printing with the generated g-code was smooth. The immediate difference in the printing process was a stringy excess of filament traced from the warm up edge print up to the disk. minimal but notably missing from the Prusa sliced disk print.
Looking deeper at the custom sliced disk, there is a sliver between the edge extrusion and the fill that has a similar stringy look and can be easily seen through. Almost like it stopped extruding before reaching the edge but still completely moving to the edge, does not appear to be an issue with the divide distance command. Height varies slightly across the disk, leaving a slight slope average a height of 1.5mm. Finally, The side seam where layers are switched is fairly minimal, in line with expectations from other prints sliced with Prusa.
The Prusa sliced test cylinder is smoother with a more uniform, and optimized, fill. Its height is uniform across the whole object. However, a glob of extruded material was laid down on the first or second layer that distorts the smooth cylinder sides.


Custom slicer disk fabrication


Prusa slicer disk fabrication
All in all the Prusa slicer produced a structurally better output. While the aesthetics was slightly flawed this is most likely a result of the printer that the produced g-code.